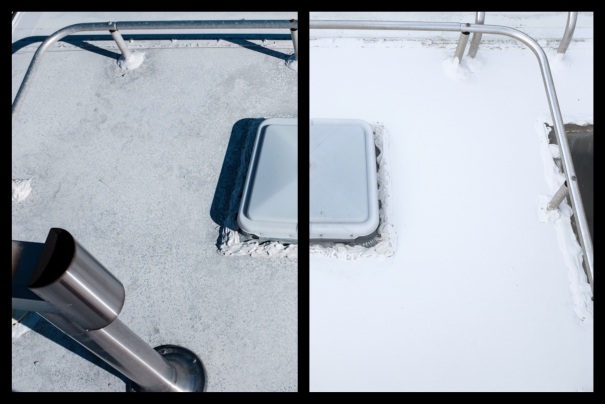
This weekend, we refinished the roof of Foxy, our 22 foot 1999 Arctic Fox Travel Trailer, in which we enjoy living full time. It was looooooong past due. The trailer is sixteen years old, and it looks like it has never had the roof refinished. The original coating appears to have more or less worn through to the roof underneath, giving it a grey speckled appearance. Not good. Here, take a look for yourself…
The Product
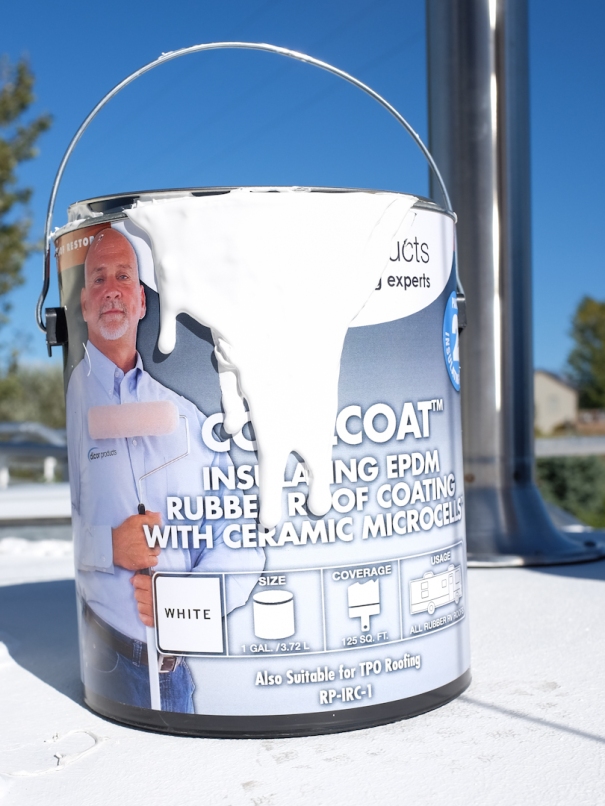
For this project, we used Dicor Cool Coat, which is an EPDM insulating roof coating (according to the advertising) proven to reduce the heat transfer from the roof to the inside of the trailer by 29%. The example used on the can is an exterior roof temperature of 106 degrees, with the interior ceiling measuring at 76 degrees. We don’t have an infrared thermometer, so we can’t prove this to be true, but it does seem to be a bit cooler inside on a warm day than it did before. There’s a bunch of sciencey-wiencey techno talk as to why it works (elastomeric resins, titanium dioxide, zinc oxide, nano-sized ceramic spheres, etcetera), but the reviews were good, which is why we decided to try it out.
We purchased 3 gallons to do the roof. As it turns out, we only needed one and a half gallons, in order to accomplish three thick coats on our 22 foot trailer. At $65 a shot, that’s an expensive miscalculation, but you win some, you lose some. I would estimate that we used about half a gallon per coat for the size trailer we own.
Prepping the Surface
To prepare the surface for the new coating, we first taped plastic drop clothes around the perimeter of trailer. (Some of the cleaner did end up washing down the sides, but for the most part, this kept the sides clear and we just sprayed the rest of after we were finished.) It turned out to be a windy day, but we managed to get the drop clothes taped down at the top and weighted at the bottom. I am admittedly terrified of heights, so I did the weighting, and Husband did most of the taping.
Once the roof was taped off, the husband swept it clean. This particular coating is a two part system. Once the roof was swept off, he applied part one, the Dicor Acrylic Rubber Roof Coating Cleaner/Activator, which, as the name suggests, cleans the roof and activates the current finish to receive the new rubber coating. We just used a standard sprayer, like you would buy to spray weedkiller with. Use a new, clean sprayer though, not the one you use to spray weeds. Once allowed to sit for 15 minutes, hubby climbed back up and pressure washed the cleaner/activator off, which made a huge mess of anything on the ground within 10 feet of the trailer. Make sure you cover up any unsuspecting plants or decorations you may have located adjacent to your RV before attempting this. Learn from our mistakes. Don’t let our struggles be in vain, oh hapless RV remodelers.
After the pressure washing was completed, we allowed the roof to fully dry, while cleaning up the mess on the ground; pressure washing the asphalt, taking the drop cloths down, and rinsing of the few places on the sides of the trailer where the run off made it through. (Also hosing off the run off spattered pepper plants in the raised bed adjacent to our trailer.)
Applying the Coating
Once all the prep work was finished and the roof was clean and dry, we applied the Cool Coat, beginning by edging around all of the roof top appliances with a 2 inch angled paint brush. We applied a nice, thick coat, because we only planned to edge once. This is one of the only times I got coerced into climbing onto the roof. Another important point: If you are a laaaaady (or a man with long hair) put it in a freaking pony tail. If you think gum is hard to get out of your locks, try EPDM rubber roofing. It is a pain in the ass to get out. I realized my mistake right before I picked up the brush, but the only thing I hate more than heights is tall ladders, sooooo… yeah. Let’s just say my hair is a wee bit shorter in one (hopefully unnoticeable) spot.
After the edging was finished, the hubby went through with a standard paint roller on an extension rod, and painted the remainder of the roof. This was allowed to dry to the touch (about 45 minutes to an hour in the sun) and then the process was repeated two more times. Here’s a couple shots of what it looked like after only one coat. What an improvement- look how clean it looks!
The application was fairly easy, and though it did require a lot of climbing up and down a really tall ladder and climbing around on the somewhat soft roof of an old travel trailer (hey, I’m no lightweight!), it was virtually painless, only requiring about six hours of work, including dry time. Below, is a final side by side comparison. The left half of the image shows the roof before refinishing, while the image on the right shows the final finished product, after the third coat.
One thing I can’t share via photograph is the difference in texture. Before, the roof was dry, chalky, and came off on your hands, knees, shoes, or whatever came in contact with it. Every time it rained, or the air conditioner condensated, more of the gross chalkiness washed down from the roof and stained the asphalt around the trailer. Now, it has this fantastic rubbery coat that has absolutely no transfer. It’s thick and waterproof, and we really couldn’t be happier.


Love this – thank you! We also live in a travel trailer while we build our house – except ours is a “Prowler”. We keep trying to fix leaks in the roof, but nothing seems to be working. We might try this – will probably help a lot! Thanks again. Look forward to following your journey!
LikeLike
That’s terrible! Is the water coming in around the appliances on the roof? If it is, it could be the lap sealant around the edges is too old and not keeping water out. We didn’t find any leaks of our own, but before refinished the roof, we went over our very old and cracked lap sealant around the appliances with new stuff. We used Dicor Self-Leveling Lap Sealant which you can get at most RV supply stores. It took us about 4.5 tubes to go over all of the old sealant on our roof. Hope that helps- leaks are the worst!
LikeLike
We have one main leak that comes in through an overhead light fixture. Thanks for the advice about the sealant!
LikeLike